Step Sixteen: How To Replace a Galaga Monitor
If you are here then you have ordered a brand new monitor and You are ready to install it in your original Pacman or Ms Pacman machine.
First please note that most arcade monitors can be fixed just by repairing the chassis; however, there are some instances where you need to replace the monitor in your arcade game entirely as it is a whole lot simplier. Cracked neck and screen burn are just some of the reasons that might lead you to consider this option. While doing this is more tedious than just removing and installing the chassis, it can be accomplished with just a few simple steps. Please review the Manual before beginning:
Caution High Voltage!!! Please unplug both the game and the Monitor before beginning! Monitors hold an extremely high amount of voltage which can be very dangerous to you should you come in contact with it. Unplug the game and Unplug Your Monitor Also:
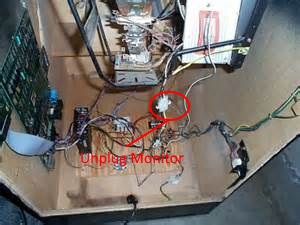
With the power wires disconnected, look for the video wires coming from the board. If you examine your wiring harness coming from your board connector, you should see a set of about 5-6 wires that connect directly to your monitor chassis via a Molex connector (or connectors as sometimes there are more than one). These wires control the video output coming from the board to the monitor.
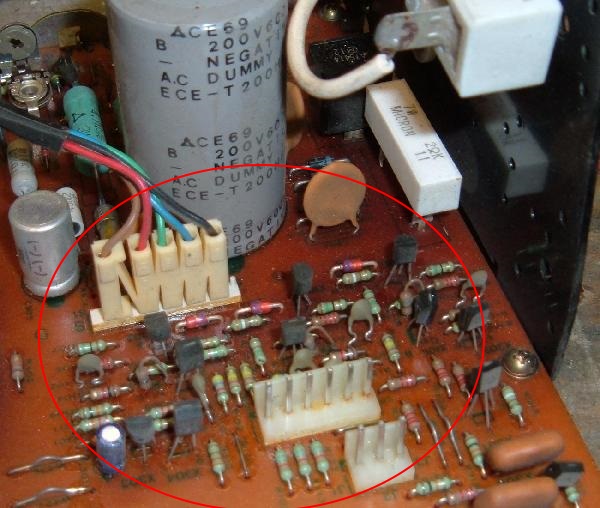
In order to get the monitor out safely, we must disconnect these wires from the monitor chassis. Make sure that you note or create a diagram of which wires go to which pins on the chassis as it will come in handy later once we have installed the other monitor. Once you have made that notation, you can remove these wires which should free your monitor from all cabinet wiring.
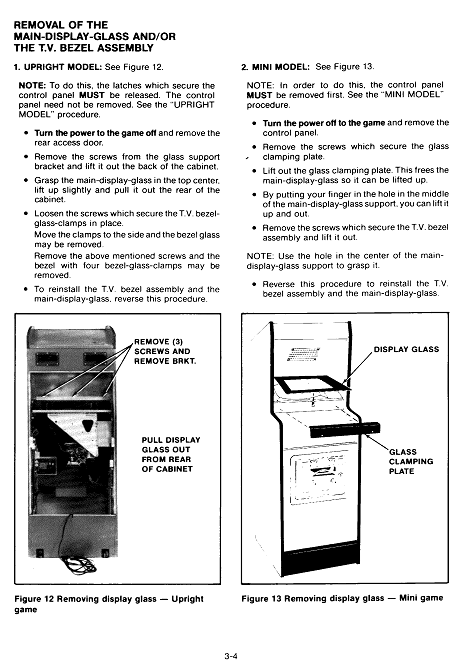
Now that all the cabinet wiring is disconnected, we can now safely remove our monitor from our arcade cabinet. Most monitors come out of the front of the arcade cabinet so you will probably need to unlatch your control panel and remove your bezel as well as any other obstructions that might block the monitor from coming out. Once we have removed these items, you should notice some sets of screws or bolts at the corners of the tube. One set holds the tube to the frame and the other set holds the frame to the cabinet. Most of the time we will want to remove the screws or bolts that are holding the frame to the cabinet so that we can remove the entire monitor and not just the tube. Please see the image below for more information.
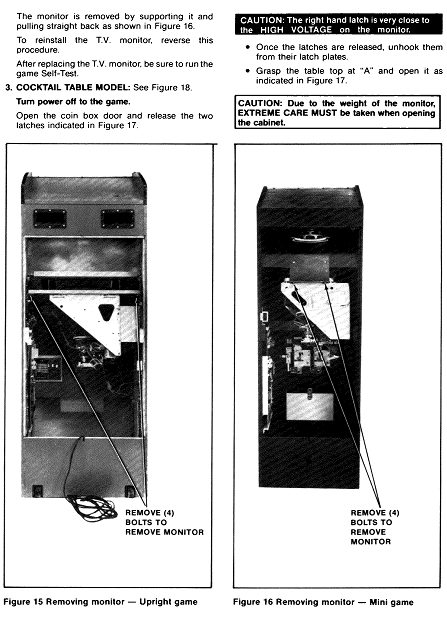
Once we have removed the bolts or screws that are holding the frame to the arcade cabinet, we can proceed with removing the monitor.
Once you have both established a firm grip, lift the monitor up and out of the cabinet. We recommend setting the monitor down on the part of the frame that supports the monitor chassis. If you plan on laying the monitor on the face of the tube, make sure that you have something soft to lay it on such as a blanket or a piece of cardboard to prevent scratches.
Before we begin the process of installing our other monitor, we recommend doing a couple of checks just to make sure that the monitor we are installing is going to work in our cabinet. The first thing you want to check is to see if the frame of the monitor your installing is similar to the monitor you just removed. If they are not the same, you might have to transfer the chassis and tube from the frame of the monitor you are installing to the frame of your old monitor. This is not a difficult process but it can be somewhat tedious. The second thing you want to check is that the monitors are roughly the same size.
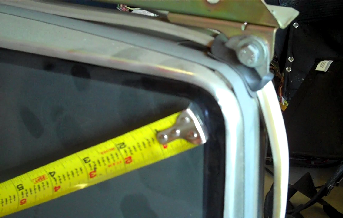
Take the length and width measurements of the monitor frame you are going to install to see if they are comparable to the monitor you are replacing. While you are taking these measurements, you might also check the viewable size of your monitor by measuring diagonally across your monitor from the inside black line. Please see the image below for more information.
Now that we’ve determined that our monitor is compatible with our cabinet, we can begin the process of installing it. We’re going to use the same process as we did when we removed the old monitor from the cabinet except in reverse. Start off with one person holding each side of the monitor. Gently lift up and place the bottom of the monitor into the cabinet. One person rotates from the side to the top of the monitor while the other person runs around to the back of the cabinet. Once the back person is in position, the front person can lean the top of the monitor into the cabinet with the back person making sure that the monitor is positioned correctly and free from obstructions. When the monitor is in place, we can then screw or bolt the frame to the cabinet to keep it from shifting when we’re moving it. At this point we should have the monitor secured to the cabinet and are now ready to wire it to our harness.In a perfect world, all of the power and video connectors that every arcade game uses would be the same and we wouldn’t have to do any conversion to get it to work. Unfortunately this is not always the case. In order to get your newly installed monitor to work in your cabinet, you need to determine what kind of connectors it uses for video and power and see if they are the same as the connectors in your cabinet. If they are not the same, you might need to do some rewiring or repinning to get them to work. If you have the video connector for the new monitor, you can always tie the wires from your cabinet harness to this connector wiring provided that you can figure out which wire goes where. Make sure you refer to the diagram that you made for the connectors on your old monitor to give you a better idea. Of course, power is a little simpler as it is only 2-3 wires which can be easily identified using a multimeter. You can also use wire nuts on these wires if you are not experienced with or do not have any Molex connectors.If you are having trouble figuring out the wiring for your newly installed monitor, here are some tips that might help you out. You might find that the newly installed monitor has a place for two sync wires but you only have one coming from your harness or vice versa. You might have to split or combine these sync wires depending on the requirements of the monitor. This can be accomplished quite simply by stripping the wire a couple of inches above the end and either tying or combining another wire into it at this point depending on the circumstance. If you’re having trouble figuring out which video wires are performing what functions, see if you can get a copy of the manual. The manual should contain the pinouts which you can then follow from the harness to determine the function of each wire.Once we have finished wiring up the power and the video, we are now ready to try out our monitor. When we turn on the monitor for the first time, we might notice that the screen is not quite right. A lot of times you will need to adjust the monitor in order to get the desired picture. If you are still having trouble getting the picture the way you want it, you might check your wiring to make sure everything is correct. It could be that you have incorrectly hooked up your sync wires. Below are some pictures of whatan out of sync screen looks like compared to a screen that just needs some hold adjustment to give you an idea of the difference. Hopefully after some minor wiring and potentiometer adjustments you can get the picture to the way that you like it.
 Return Home


