Step Three: Fuse and Power Repair
Again if you’re game has sights and sounds and you can see something on the monitor then your power supply and/or fuses are more than likely good and not the cause of your problems. So if this is the case then skip ahead to Step Four: Fixing the Galaga PCB.
If you’re still here and all of the trouble shooting in the first section didn’t fix your “dead” game, then in this step we will first test the main fuses and then go on to the power supply. Locate the fuses inside the game. If you can’t locate them refer to the manual here:
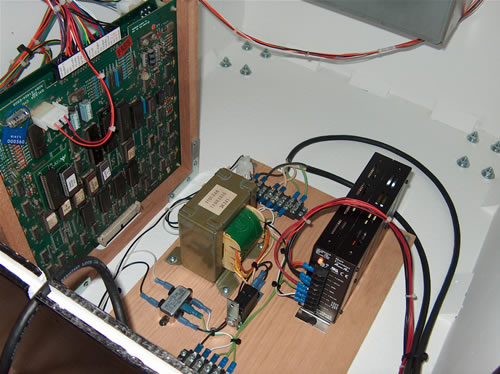
They should be located near the power supply on the bottom floor of the game. At this point you may encounter a different setup than what was originally installed.
Let me explain, in most games made before 1984, power supplies differed. Some games required unique power requirements. Without getting too technical; all arcade games use a printed circuit board or (PCB) which require +5 Volts DC to power the boards. Nearly all use +12 Volts DC to power the sound amplifier and in certain cases -5 Volts DC in the sound generation section of the board as well. In addition certain games require additional voltages such as –12 VDC to power certain chips. The important thing to note here is that games made after 1985, generally had the necessary power requirements (+5 VDC, +12 VDC and –5VDC) so many operators did away or by-passed the original power supplies of pre-1985 games in favor of the cheaper and more disposable 15 amp power supplies. So the Pacman game you now own could either have the old original power supply or could have been “upgraded” to a new 15 amp switching power supply. (Or could still have both inside it!)
Since the back door of your game is still opened, identify which power supply you have installed inside your Galaga; is it the old or new one? (If you have both then concentrate on the 15 amp power supply as it is far more likely to be the one in use now and the operator just left the old one in its’ place.)
A. If you have the old power supply then start here and read below.
(Scroll down to B. if you have the new 15 amp power supply.)

First, Unplug your machine again and look to find the fuses. They will be located beside the old power supply assembly. Refer to your manual here.
Make Sure the machine is unplugged not just turned off or this could shock you. If unplugged you’ll be fine so don’t worry.
Here are the Fuses that should be in all original Galaga cabinets
1) 2 Amp Slow-Blow Fuse for the main AC input. (A Short in electric wall plug may blow this fuse. )
1) 2 Amp Slow-Blow Fuse for monitor feed (this is not the fuses on the monitor itself)
Cocktail only
2) 1/2 Amp Slo Blow Fuses 250v
1) 1 1/2 Amp Slow blow for lights
Upright & Mini
2) 2 Amp Fuses 250v slow Blow

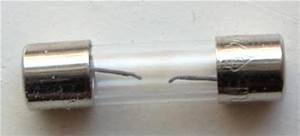
(Careful not to lift too fast or with a lot of force as you may shatter a possible good fuse.) Now lift it out and test this fuse to see if it’s good with an Ohm meter.
(To use an OHM meter set the reader to beep whenever the two metal rods touch each other or in other words you are reading the continuity. You wont have to worry about what the readings say etc, you just need to hear the beep). If the fuse is good the OHM meter will beep. Meaning that the electrical current is still able to flow through it. If the fuses are bad then you won’t hear a beep sound and you’ll also possibly see burn marks inside the fuse etc…but sometimes you won’t so don’t just use your eyes, use the Ohm meter. Test every fuse you find in the same manner so you can be sure, but concentrate on the 2 Amp Slow-Blow Fuse for the main AC input and the 2 Amp Slow-Blow Fuse for the monitor feed. These will cause a “dead game” to happen as the main fuse won’t allow any power to the game. If all fuses test good then clean them off from the years worth of dust or lent and put them right back in the same place you pried them loose from. (Be careful not to place a fuse in another spot as each fuse might have a different amp/volt value) If you do find a bad fuse replace it and replace it with the same volt and amp rating as the original blown fuse. Please refer to the manual for the exact value.
If you find a blown fuse, you may have just found why no power is getting to your game. Replace the bad fuse with a good fuse and stand away from the game, now plug the game back in and turn it on. If the game comes back to life then congrats! Your whole trouble was just a simple blown fuse.
However, if you blow the same fuse again instantly when you power the game back on; then your trouble is still elsewhere; probably lies within the monitor or marquee lights which are still blowing the main fuse(s) each time power goes through it.
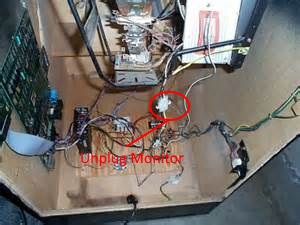
To test this to see if you have a bad monitor, simply unplug the game again and take another fuse to replace the one you have just blown. Now look at the monitor itself inside your game. Locate the power chord which plugs into the monitor itself and runs down to the isolation transformer. More than likely there will be a molex connector connecting these two power wires together. All you have to do is unplug this molex connection.
With the entire game still unplugged put a new “good” replacement fuse in again. Now with the monitor itself still unplugged, plug back in the entire game. If the new fuse doesn’t blow this time with the monitor unplugged and the sounds of the game comes on with exception of the monitor(since you’ve just unplugged it; then your monitor is shorting the main fuse and the monitor is broken and must be replaced or fixed. (Probably a blown fly back) Go to the monitor section now.
Try also doing the same procedure for the marquee lights. Leave them unplugged and power the entire game back on to see if the fuses don’t blow. If they don’t blow then you have located the problem and you’ll need to replace your marquee lights. Or if they aren’t critical to your home play; then you can just leave them unplugged.
B. I have the 15 amp Power supply:
I love the 15 amp power supplies. They are very simple to use and chances are if your Pacman game is still not working the problem could be here.
First plug your game back in and look to see if your power supply has a LED light ON.
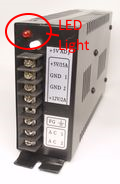
If not follow the main plug chord coming into the game from the plug receptacle and see if it passes through a main F1 fuse or any fuse which it should. Or You may just want to replace the 15amp power supply with a new one at this point just to rule out all possibility.
All Cabinets
1) 2 Amp Slow-Blow Fuse for the main AC input. A Short in electric wall plug may blow this fuse.
1) 2 Amp Slow-Blow Fuse for monitor feed (this is not the fuses on the monitor itself)
Fuses & fuse holders must be free of corrosion and the fuse holders must tightly grip the fuses to work. If you see that the electric path travels through a fuse– Unplug your machine, take a flat head screw driver and wedge it under the fuse. Pry it up from the fuse holders on either side. Or it maybe inside a cylindrical capped fuse holder if so twist the cap and it will pop out.
(Careful not to lift too fast or with a lot of force as you may shatter a possible good fuse.) Now lift out the first fuse. Test this fuse to see if it’s good with an Ohm meter.
(To use an OHM meter set the reader to beep whenever the two metal rods touch each other. You wont have to worry about what the readings say etc, just need to hear the beep). If the fuse is good the OHM meter will beep. Meaning that the electric current is able to flow through it. If the fuse(s) are bad then you wont hear a beep sound and you’ll also possibly see burn marks inside the fuse but sometimes you won’t. Test all of them you find so you can be sure, if good put them right back in their same place you got them from. (Be careful not to place them in another spot as each fuse may have a different amp value) If you do find a bad one replace it and replace it with the same volt and amp rating as shown on the blown fuse.
If you do find a blown fuse after that procedure then you may have just found why no power is getting to your game. With the game unplugged replace the fuse and stand away from the game, plug the game back in and turn it on. If the game comes back to life then congrats! Your whole trouble was just a simple blown fuse.
However, if you blow the same fuse again instantly when you power the game back on; then your trouble is still elsewhere and probably lies within the monitor or marquee lights which are still blowing the main fuse(s) when powered on.
To test this to see if you have a bad monitor, unplug the game again and take another fuse to replace the one you have just blown. Now look at the monitor it self inside your game. Locate the power chord which plugs into the monitor itself and runs down to the isolation transformer. More than likely there will be a molex connector connecting these two power wires together. All you have to do is unplug this molex connection.
With the entire game still unplugged put a new “good” replacement fuse in again. Now with the monitor itself still unplugged, plug back in the entire game. If the new fuse doesn’t blow this time with the monitor unplugged and the sounds of the game comes on with exception of the monitor(since you’ve just unplugged it; then your monitor is shorting the main fuse and the monitor is broken and must be replaced or fixed. (Probably a blown fly back) Go to the monitor section now.
Try also doing the same procedure for the marquee lights. Leave them unplugged and power the entire game back on to see if the fuses don’t blow. If they don’t blow then you have located the problem and you’ll need to replace your marquee lights. Or if they aren’t critical to your home play; then you can just leave them unplugged.
If still not powering on:
The reason your game is not coming on is logically no power is getting to it. We have tried to find the causes of this by checking every entry point of the electricity and On/Off switches to the game.
These are the only “fixes” it could be as far as the power section goes by completing those procedures you should have by now located your problem. If not then you must seek a qualified technician, or simply start replacing things starting with the monitor, the marquee lights, then the power supply and PCB until you find the cause of your “dead” game problem. Proceed to Step Four: Galaga PCB Repair
For More on power supplies goto Installing 15Amp Power Supply and converting Galaga to Jamma Page